Bioinformatics - BIOL 5340
Course Information:
This course provides an introduction to bioinformatics and computational genomics. The course is geared toward the student with a biology background and limited programming experience. Coursework will be completed almost exclusively in the UNIX/Linux computing environment and students will learn to program using Python. Students will learn: how to reframe biological problems into computationally tractable questions, basic computational biology algorithms, analyses of genome and transcriptome data.
Project Objective:
Find the orthologs among the 5 species of beetles and annotate the orthologs.
Background Information:
Instructions:
| Group | Members | Instructions | Quick Guide |
|---|---|---|---|
| 1. | p1,q1,r1,s1,t1 | Group1 | Link |
| 2. | p2,q2,r2,s2,t2 | Group2 | Link |
| 3. | p3,q3,r3,s3,t3 | Group3 | Link |
| 4. | p4,q4,r4,s4,t4 | Group4 | Link |
| 5. | p5,q5,r5,s5,t5 | Group5 | Link |
Your project depends on some of the following softwares/programs to carry out a specific task. Installation instructions are given below.
Dependencies:
- Sequence Reads
- It is a good practice to have all your reads in one directory.
- You can copy the sequence reads to your working directory using
cpcommand or globus file transfer. - The sequence reads are available in the following path.
/work/01248/jpdemuth/stampede2/5340_share/reads
- Trinity Assembly
- It is a good practice to have all your Trinity assemblies in one directory.
- You can copy the assembly files to your working directory using
cpcommand or globus file transfer. - The assemblies are available in the following path.
/work/01248/jpdemuth/stampede2/5340_share/trinity_assembly
- Conda
- What is
conda?- Conda is an open source package and environment manager for python and other languages. It helps installing packages and its dependencies easier. It is also useful in downgrading or upgrading to different versions of the same package.
- How to get and install
conda?- Choose 64-bit Linux Installers for Python 3.7
# Navigate to home directory cd ~ # Get the installer. wget https://repo.anaconda.com/miniconda/Miniconda3-latest-Linux-x86_64.sh # Run the installer. bash Miniconda3-latest-Linux-x86_64.sh- Note: Type “yes” to the following warning during installation.
WARNING:You currently have a PYTHONPATH environment variable set. This may cause unexpected behavior when running the Python interpreter in Miniconda3. For best results, please verify that your PYTHONPATH only points to directories of packages that are compatible with the Python interpreter in Miniconda3: /home1/01248/[username]/miniconda3
- Note: Type “yes” to initialize Miniconda3.
- How to check if
condais active?- If
condais active you will see(base)at the beginning of the shell prompt as shown below.
- If conda is not active you can activate by sourcing the
.bashrcfile from your home directory as follows.# Activate conda by using source source ~/.bashrc
- If
- What is
- BUSCO
- What is
busco?- BUSCO stands for Benchmarking Universal Single-Copy Orthologs. BUSCO is primarily used to analyze the completeness of a genome, a transcriptome or a gene set by using highly conserved orthologs for a given lineage.
- How to get and install
busco?- Install busco using conda as follows.
conda create -n busco -c bioconda busco- Type
yesoryto install all dependencies.
- This installs BUSCO but unfortunately, the configuration file isn’t setup. To setup the configuration file,
cdtominiconda3/envs/busco/config/directory.wget https://rameshbalan.github.io/bioinfo/data/config.ini.
- Install busco using conda as follows.
- How to check if
buscois installed properly?# cd to home directory cd ~ # Get the lineage wget https://busco.ezlab.org/datasets/endopterygota_odb9.tar.gz # Uncompress the directory. tar xvf endopterygota_odb9.tar.gz --gunzip # Activate busco environment conda activate busco # Run BUSCO run_busco --in [name_of_]trinity_assembly.fasta --out [output_directory_name] -l [path_to_]endopterygota_odb9 -m tran- If you get an error, please ask for assistance.
- To run
buscofrom ansbatchscript it is necessary to source the.bashrcfile and to activate busco environment. Here is a sample sbatch script.- You can view the sbatch file here : Link
- If you were to use the sample busco sbatch script, please make sure to change your email id in the script.
Note:
buscotakes more than 12 hours to complete on a knl node. However, it takes less than 30 minutes on a skylake node. The abovesbatchscript is for a skylake node.
- What is
- cd-hit
- What is
cd-hit?cd-hit(cd-hit-est) is a clustering program for protein (nucleotide) sequences to reduce sequence redundancy.
- How to get and install
cd-hit?- Navigate to your home directory using
cd ~and install as follows.# Get the installer. wget https://github.com/weizhongli/cdhit/releases/download/V4.8.1/cd-hit-v4.8.1-2019-0228.tar.gz # Uncompress the package. tar xvf cd-hit-v4.8.1-2019-0228.tar.gz --gunzip # Navigate to the directory and build the programs. cd cd-hit-v4.8.1-2019-0228 make
- Navigate to your home directory using
- How to add
cd-hitto the path variable?# Open .bashrc file nano ~/.bashrc # Add the path export PATH=$PATH:~/cd-hit-v4.8.1-2019-0228 - How to check if
cd-hitis installed properly?# Source the .bashrc source ~/.bashrc # Try cd-hit -h- This will print the usage and various options available in
cd-hitas shown below.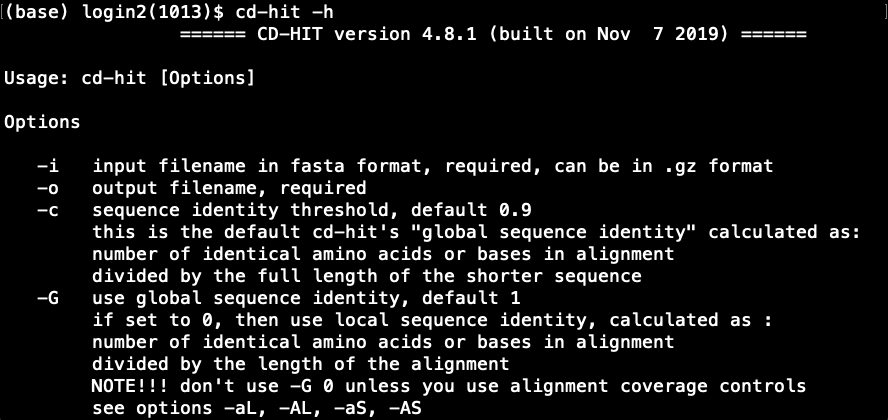
- If you get an error, please ask for assistance.
- This will print the usage and various options available in
- What is
- salmon
- What is
salmon?salmonis an alignment free mapping tool to quantify the expression of transcripts. It is extremely fast and has several useful in-built flags such as--gcBiasand--seqBiaswhich models the bias in the sample and corrects for it.- Install salmon using conda as follows.
conda create -n salmon -c bioconda salmon
- To use salmon in
idevmodeconda activate salmon
- To use salmon in
sbatchscript, please source the.bashrcfile and activate salmon.# Source bashrc source ~/.bashrc # Activate salmon conda activate salmon
- What do I do if I get a
salmon: error while loading shared libraries: libboost_iostreams.so.1.60.0:error?- We could use salmon in galaxy. Here are the instructions.
- You can import the following galaxy history provided here. - Galaxy History
- This history has all the reads and the four de novo trinity assembly required to run salmon.
- You may have to add T_cas reference transcriptome to your history. Here is the link. - T_cas Transcriptome
- Salmon is available as a tool in Galaxy. - Salmon in Galaxy
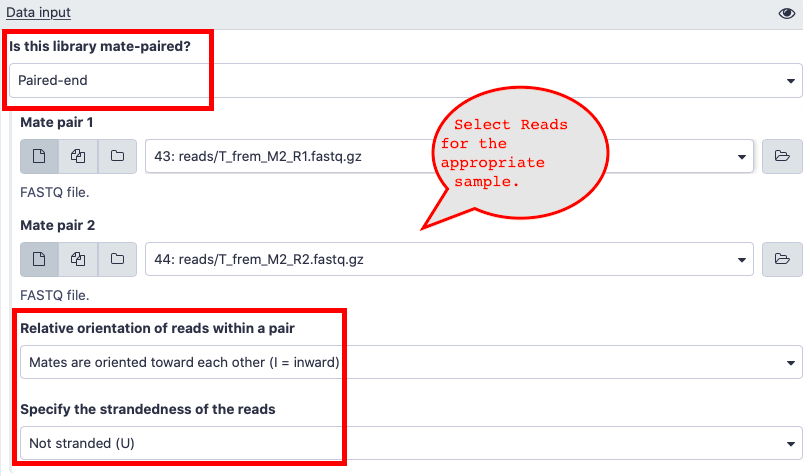
- Here are answers to some of the questions about the input data in salmon.
- Is this library mate-paired?
- Paired-end
- Relative orientation of reads within a pair
- Mates are oriented towards each other(I = inward)
- Specify the strandedness of the reads
Not stranded (U)
- Not Stranded (U)
- Not Stranded (U)
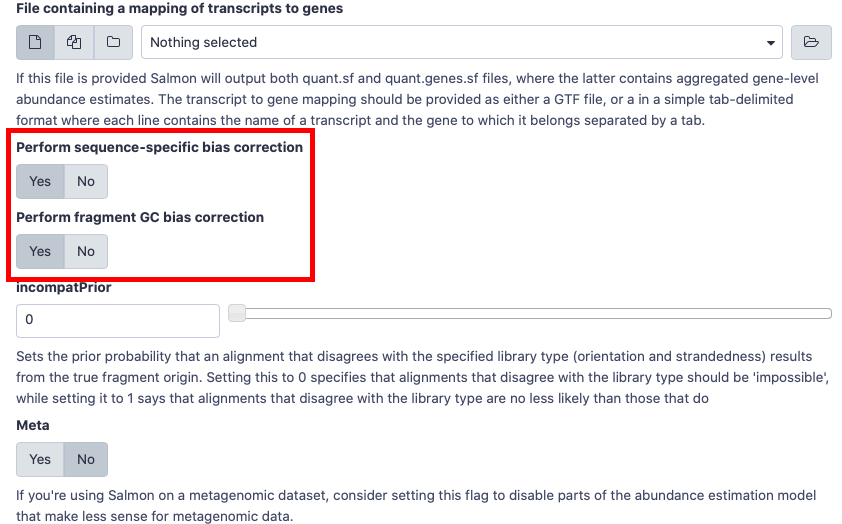
- Please choose
Yesfor gcBias and sequence-specific Bias when you run salmon.
- Is this library mate-paired?
- Here are answers to some of the questions about the input data in salmon.
- What do I do if I get a
bad_alloc()error?- This will happen if you are in group 1 or group 5.
- We think this error has to do with the memory allocation on Stampede2 when salmon is called. One of the workaround, is to use
trinityby callingsalmonin a script. The instructions are as follows.- Install
trinity# Navigate to home directory cd ~ # Getting Trinity wget https://github.com/trinityrnaseq/trinityrnaseq/releases/download/v2.8.6/trinityrnaseq-v2.8.6.FULL.tar.gz # Uncompressing Trinity tar xvf trinityrnaseq-v2.8.6.FULL.tar.gz # Installing trinity cd trinityrnaseq-v2.8.6 make make plugins - Dependencies.
module load intel/17.0.4 module load samtools conda activate salmon - We can either add
trinityrnaseq-v2.8.6/utilto the$PATHor we could type the path to the script. - Using
align_and_estimate_abundance.plscript intrinityrnaseq-v2.8.6/utildirectory, we can estimate expression as follows.# Estimating Expression align_and_estimate_abundance.pl --transcripts T_frem.fasta --seqType fq --left reads/T_frem_M1_R1.fastq.gz --right reads/T_frem_M1_R2.fastq.gz --est_method salmon --output_dir T_frem_M1 --prep_reference
- Install
- Here is a sample sbatch script to run salmon. - Link
- Please change the email id and other parameters for the
align_and_estimate_abundance.plto reflect the sample that you want to quantify in the example sbatch script.
- Please change the email id and other parameters for the
- Feel free to ask for assistance.
- What is
- TransDecoder
- What is
TransDecoder?- Coding regions within the transcript sequences can be identified by using
TransDecoder. It has two major steps. The first step identifies the Open Reading Frames (ORFs) and then it predicts the likely coding regions.
- Coding regions within the transcript sequences can be identified by using
- How to get and install
TransDecoder?# Navigate to the home directory cd ~ # Get the package. wget https://github.com/TransDecoder/TransDecoder/archive/TransDecoder-v5.5.0.tar.gz # Uncompress the package. tar xvf TransDecoder-v5.5.0.tar.gz --gunzip - Add TransDecoder to the path variable in bashrc.
# Open .bashrc file nano ~/.bashrc # Add the path export PATH=$PATH:~/TransDecoder-TransDecoder-v5.5.0 - How to check if TransDecoder is installed properly?
# Source the .bashrc source ~/.bashrc # Try TransDecoder.LongOrfs -h- This will print the usage and various options available in
TransDecoder.LongOrfsas shown below.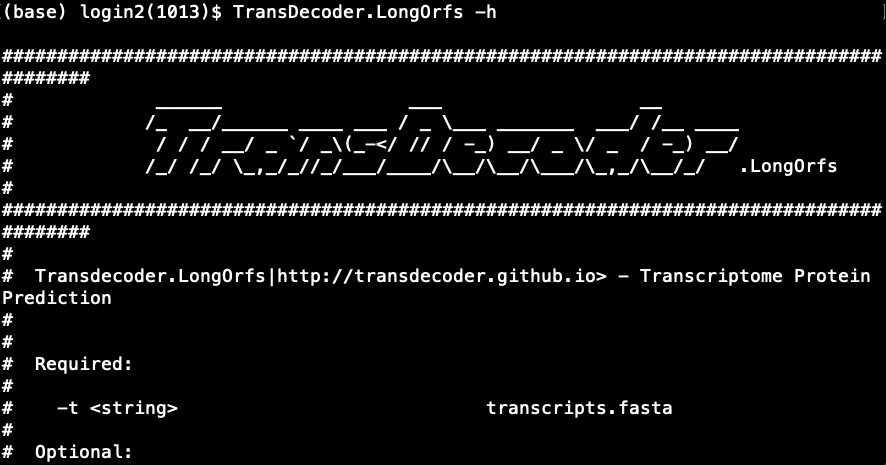
TransDecoder.Predictis in the same directory asTransDecoder.LongOrfsand you can test it by usingTransDecoder.Predict -h- If you get an error, please ask for assistance.
- This will print the usage and various options available in
- What is
- python3
- This should be available via conda and also as a module in Stampede2.
- Try
python3in the terminal. If you get an error, trymodule load python3.
- BLAST
- This should be available as a module in Stampede2 and also in
buscoenvironment. - Try
module load blastorconda activate buscofollowed byblastp.
- This should be available as a module in Stampede2 and also in